本記事は、Cerevoスタッフが業務や趣味について思うままに書き綴るアドベントカレンダー企画「Cerevo アドベントカレンダーTechBlog 2019」の第6日目です。
Cerevo アドベントカレンダーTechBlog 2019
https://tech-blog.cerevo.com/archives/category/adventcalendar/2019/
格安PCオシロで遊んでみよう
・帯域幅:250MHz(帯域制限20MHz選択設定あり)
・サンプリングレート:1Gsps
・チャンネル数:4ch
・バッファ:64K(1チャンネル時)、32K(2チャンネル使用時)、16K(3チャネル以上使用時)
・入力端子:BNCコネクタ×4、1MΩ、25pF±3pF
・入力感度:2mV/div~10V/div
・入力範囲:±10mV~±10V(×1プローブ)、±100mV~±100V(×10プローブ)
・最大入力電圧:35V@DC+AC Peak(過電圧保護:400V@DC+AC Peak)
・タイムベース:2nS/div~1000S/div(1-2-5シーケンス)
・計測機能:時間、周波数、各種電圧(Vpp、Vrms等)など20項目
・演算機能:反転、加算、減算、乗算、除算、FFT
・AWG:DC~25MHz(設定上限は75MHz)、±3.5Vmax、50Ω、Ipeak50mA
・本体寸法:20x123x38mm(最大突起を含む)
・本体重量:470g(防護カバーを含む)
・PC接続インターフェース:USB2.0
・対応OS:Windows7、8、8.1、10(32/64ビット)
普通にオシロとして使う
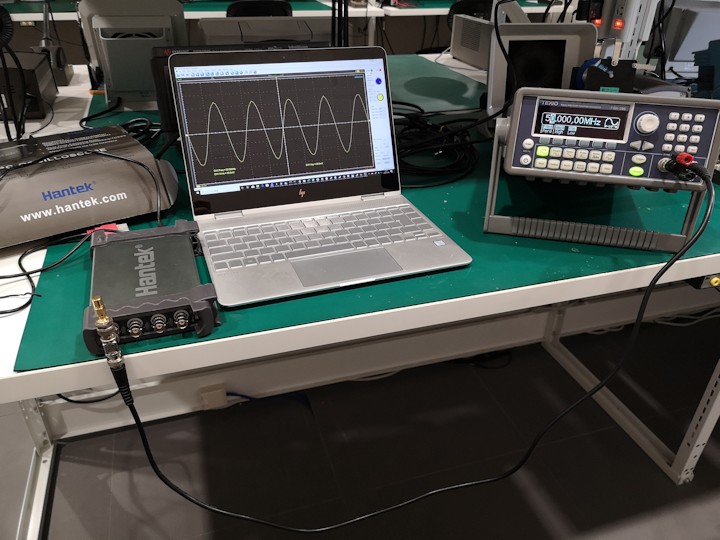
DMM.make AKIBA のファンクションジェネレータをお借りして波形を表示させてみました。このファンクションジェネレータは50Ω出力ですがオシロの方は50Ω入力に対応していないため、簡易的に整合を取るためBNCのT分岐コネクタと終端抵抗を使用しました。
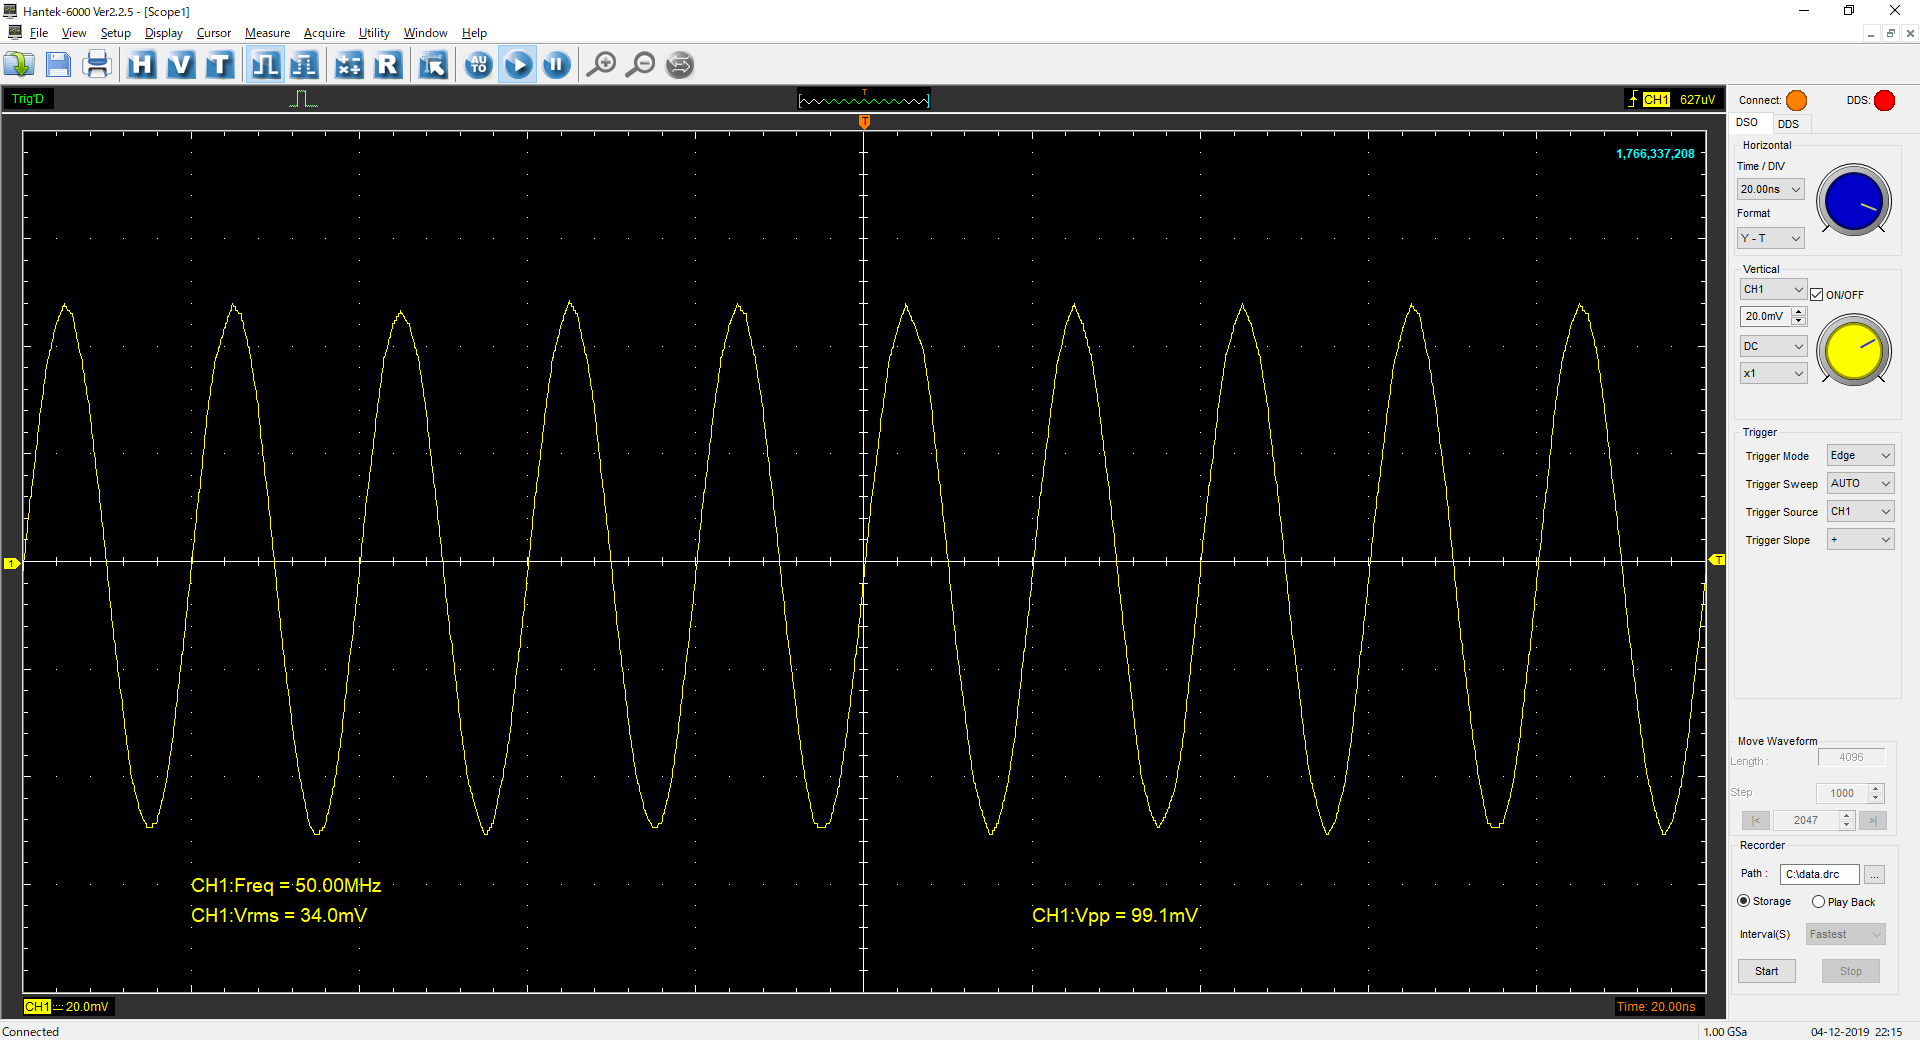
使用したファンクションジェネレータの出力できる上限である50MHzの正弦波を入力してみましたが、波形はきれいに表示されており電圧の測定値も正確です。
この価格帯のオシロにしては十分すぎるでしょう。
操作を自動化してみる
せっかくPCに接続して動くオシロなので、操作を自動化できたら面白そうです。
6254BDは製造元からSDKが公開されており、その気になればPCアプリを自作することも可能です。しかしながら筆者はプログラミングに関する知識が無く、サンプルコードをビルドしたっきりそれ以上先に進めませんでした。そこで、もっと手軽な方法がないかを考えました。
PowerShellを使った自動化
付属のWindowsアプリはほとんどの操作をキーボードショートカットによって操作が可能です。この点に着目し、何らかの方法でキーボード操作をエミュレートできれば操作の自動化が可能になりそうです。
Windows環境でのこのような場面で、PowerShellというスクリプト言語が便利そうだったので今回初めて使ってみました。最近のWindowsであればデフォルトで入っており、開発環境の構築といった作業なしに使えます。
次の例では、付属アプリの立ち上げと設定ファイルの読み込みまでを自動化しています。
'C:\Program Files (x86)\Hantek6000\Scope.exe'                                    #付属アプリを起動する
while ( (Get-Process | Where-Object {$_.Name -match "scope"}) -eq $null ){}        #"scope"というプロセスが現れるまで待つ
start-sleep -Milliseconds 1000
[System.Windows.Forms.SendKeys]::SendWait("(% X)")                                #Alt+Space+Xで最大化する
[System.Windows.Forms.SendKeys]::SendWait("%f")                                    #Alt+fでファイルタブを開く
start-sleep -Milliseconds 10
[System.Windows.Forms.SendKeys]::SendWait("{down 3}")                            #↓3回で"Load Setup"を選択
start-sleep -Milliseconds 10
[System.Windows.Forms.SendKeys]::SendWait("{enter}")
start-sleep -Milliseconds 10
$retry_cnt = 0
Set-Clipboard -Value "neko"
do{                                                                                #"."を入力し、Ctrl+a,Ctrl+c操作でクリップボードの内容が"."になるまで待つ

    [System.Windows.Forms.SendKeys]::SendWait(".")
    [System.Windows.Forms.SendKeys]::SendWait("^a")
    [System.Windows.Forms.SendKeys]::SendWait("^c")
    start-sleep -Milliseconds 100
    $clip_board = Get-Clipboard -Format Text
    $retry_cnt = $retry_cnt + 1
    if( $retry_cnt -gt 10 ){
        break
    }
}while( $clip_board -ne "." )
start-sleep -Milliseconds 10
[System.Windows.Forms.SendKeys]::SendWait("^a")
[System.Windows.Forms.SendKeys]::SendWait("^x")
[System.Windows.Forms.SendKeys]::SendWait("voltage_check.set")                    #ファイル名を入力
start-sleep -Milliseconds 10
[System.Windows.Forms.SendKeys]::SendWait("{enter}")
start-sleep -Milliseconds 100
[System.Windows.Forms.SendKeys]::SendWait("^r")                                    #Ctrl+rで波形観測開始
まずPCオシロ付属のアプリを実行ファイルのパスを指定して起動し、プロセス一覧を監視しながら”scope”というプロセスが現れるのを待ちます。
その後キーボードエミュレーションによりウィンドウの最大化と設定ファイルの読み込みを行います。
Alt+Fに相当する操作により”File”タブを展開し、矢印操作により”Load Setup”を選択しファイルオープンダイアログを表示させます。
ファイルオープンダイアログが現れたタイミングでファイル名を入力しますが、現れるまでの時間が毎回異なるのでクリップボード操作を繰り返し行い、入力→全選択→カット操作が成立したタイミングを検出します。
もしかしたらもっとスマートな方法があるかもしれません。
ファイルオープンダイアログが表示されたら、予め用意しておいた”ac100.set”という設定ファイルを読み込み、Ctrl+rのショートカットで波形の取り込みを開始します。
簡易検査治具として使う
電子回路を使用した製品を製造する際、まず基板への部品実装やファームウェアの書き込みが終わった段階で、本当にその基板が正しく動作するのかを確認するための検査を行います。
具体的には、電源を供給して回路を動作させ、予め定めたポイントの波形や電圧、電流等を確認します。
PCオシロの操作を自動化することで、これと似たような事ができないか試してみることにします。
架空の製品”抵抗分圧器”

電源として5Vを供給すると、正しく動作していれば各テスト端子からそれぞれ1V,2V,3V,4Vが出力されるはずの製品を仮定してみます。
テスト端子の電圧が±10%に収まっていれば良品とみなす検査治具を作ってみたいと思います。
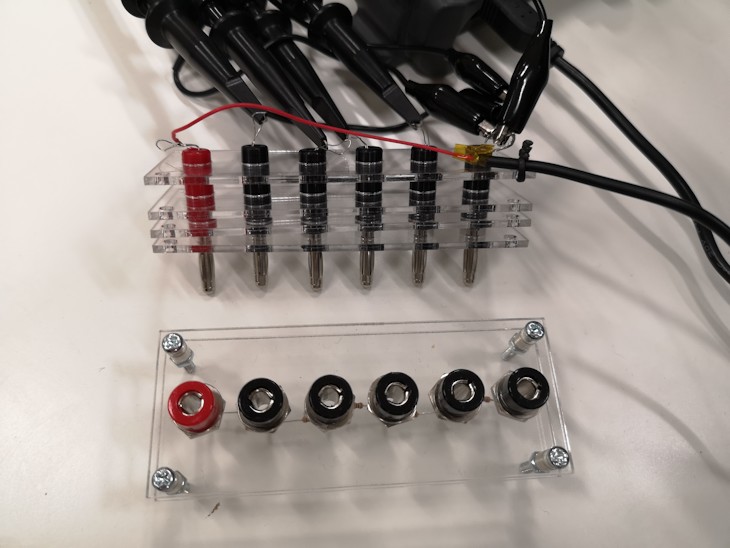
ちょっと大げさですが、見た目的なわかりやすさのためにテストポイントをバナナソケット、テストプローブをバナナプラグで作ってみました。
付属アプリの起動から電圧チェックまでを自動化するスクリプトを以下に示します。
Add-Type -Assembly System.Windows.Forms

$ch1_min = 0.9                                                                    #OKとする上限と下限
$ch1_max = 1.1
$ch2_min = 1.8
$ch2_max = 2.2
$ch3_min = 2.7
$ch3_max = 3.3
$ch4_min = 3.6
$ch4_max = 4.4

& 'C:\Program Files (x86)\Hantek6000\Scope.exe'                                    #付属アプリを起動する
while ( (Get-Process | Where-Object {$_.Name -match "scope"}) -eq $null ){}        #"scope"というプロセスが現れるまで待つ
start-sleep -Milliseconds 1000
[System.Windows.Forms.SendKeys]::SendWait("(% X)")
[System.Windows.Forms.SendKeys]::SendWait("%f")
start-sleep -Milliseconds 10
[System.Windows.Forms.SendKeys]::SendWait("{down 3}")
start-sleep -Milliseconds 10
[System.Windows.Forms.SendKeys]::SendWait("{enter}")
start-sleep -Milliseconds 10
$retry_cnt = 0
Set-Clipboard -Value "neko"
do{

    [System.Windows.Forms.SendKeys]::SendWait(".")
    [System.Windows.Forms.SendKeys]::SendWait("^a")
    [System.Windows.Forms.SendKeys]::SendWait("^c")
    start-sleep -Milliseconds 100
    $clip_board = Get-Clipboard -Format Text
    $retry_cnt = $retry_cnt + 1
    if( $retry_cnt -gt 10 ){
        break
    }
}while( $clip_board -ne "." )
start-sleep -Milliseconds 10
[System.Windows.Forms.SendKeys]::SendWait("^a")
[System.Windows.Forms.SendKeys]::SendWait("^x")
[System.Windows.Forms.SendKeys]::SendWait("voltage_check.set")
start-sleep -Milliseconds 10
[System.Windows.Forms.SendKeys]::SendWait("{enter}")
start-sleep -Milliseconds 100
[System.Windows.Forms.SendKeys]::SendWait("^r")
start-sleep -Milliseconds 1000
while ( ( [System.Windows.Forms.MessageBox]::Show( "実行しますか?", "実行確認", "YesNo", "Question" ) ) -eq "Yes") {    #実行するかどうか確認のダイアログを表示
    if( ( Get-Process | Where-Object {$_.Name -match "scope"} ) -eq $null ){    #付属アプリのプロセスが存在しなければ終了する
        exit
    }
    [System.Windows.Forms.SendKeys]::SendWait("^r")                                #Ctrl+rで波形観測スタート
    start-sleep -Milliseconds 1000
    [System.Windows.Forms.SendKeys]::SendWait("^s")                                #Ctrl+sで波形保存
    [System.Windows.Forms.SendKeys]::SendWait("{tab}")
    [System.Windows.Forms.SendKeys]::SendWait("{right 4}")                        #TABを1回、→を4回で"ALL"を選択
    [System.Windows.Forms.SendKeys]::SendWait("{enter}")
    $retry_cnt = 0
    Set-Clipboard -Value "neko"
    do{                                                                            #ファイルオープンダイアログの表示待ち

        [System.Windows.Forms.SendKeys]::SendWait(".")
        [System.Windows.Forms.SendKeys]::SendWait("^a")
        [System.Windows.Forms.SendKeys]::SendWait("^c")
        start-sleep -Milliseconds 100
        $clip_board = Get-Clipboard -Format Text
        $retry_cnt = $retry_cnt + 1
        if( $retry_cnt -gt 10 ){
            break
        }
    }while( $clip_board -ne "." )
    start-sleep -Milliseconds 10
    [System.Windows.Forms.SendKeys]::SendWait("^a")
    [System.Windows.Forms.SendKeys]::SendWait("^x")
    [System.Windows.Forms.SendKeys]::SendWait("test.txt")                        #保存ファイル名を指定
    [System.Windows.Forms.SendKeys]::SendWait("{enter}")
    start-sleep -Milliseconds 1000
    [System.Windows.Forms.SendKeys]::SendWait("{enter}")                        #"Save Data OK"のダイアログにOKを押す
    start-sleep -Milliseconds 500
    $txt = Get-Content test.txt                                                    #保存された波形データを読み込む
    $txt_ch1 = $txt[5..4100]                                                    #各Chごとに分割
    $txt_ch2 = $txt[4108..8203]
    $txt_ch3 = $txt[8211..12306]
    $txt_ch4 = $txt[12314..16409]
    $sum = 0.0                                                                    #各Chの平均値を算出
    $txt_ch1 | ForEach-Object -Process {$sum = $sum + [double]$_}
    $avg1 = $sum / 4096.0
    $sum = 0.0
    $txt_ch2 | ForEach-Object -Process {$sum = $sum + [double]$_}
    $avg2 = $sum / 4096.0
    $sum = 0.0
    $txt_ch3 | ForEach-Object -Process {$sum = $sum + [double]$_}
    $avg3 = $sum / 4096.0
    $sum = 0.0
    $txt_ch4 | ForEach-Object -Process {$sum = $sum + [double]$_}
    $avg4 = $sum / 4096.0

    if( $avg1 -ge $ch1_min -And $avg1 -le $ch1_max ){                            #各Chに対してOK/NGを判定する
        $ch1_judge = "OK"
    }else{
        $ch1_judge = "NG"
    }
    if( $avg2 -ge $ch2_min -And $avg2 -le $ch2_max ){
        $ch2_judge = "OK"
    }else{
        $ch2_judge = "NG"
    }
    if( $avg3 -ge $ch3_min -And $avg3 -le $ch3_max ){
        $ch3_judge = "OK"
    }else{
        $ch3_judge = "NG"
    }
    if( $avg4 -ge $ch4_min -And $avg4 -le $ch4_max ){
        $ch4_judge = "OK"
    }else{
        $ch4_judge = "NG"
    }
    $result = "Ch1:"+[string]$avg1+"[V]    "+$ch1_judge+"`n"+"Ch2:"+[string]$avg2+"[V]    "+$ch2_judge+"`n"+"Ch3:"+[string]$avg3+"[V]    "+$ch3_judge+"`n"+"Ch4:"+[string]$avg4+"[V]    "+$ch4_judge    #結果の文字列を生成
    if( $ch1_judge -eq "OK" -And $ch2_judge -eq "OK" -And $ch3_judge -eq "OK" -And $ch4_judge -eq "OK" ){    #全ChがOKであればOKダイアログを表示
        [System.Windows.Forms.MessageBox]::Show( $result, "OK", "Ok", "Information" )
    }else{
        [System.Windows.Forms.MessageBox]::Show( $result, "NG", "Ok", "Error" )                                #1chでもNGであればエラーダイアログを表示
    }
    Remove-Item test.txt
}
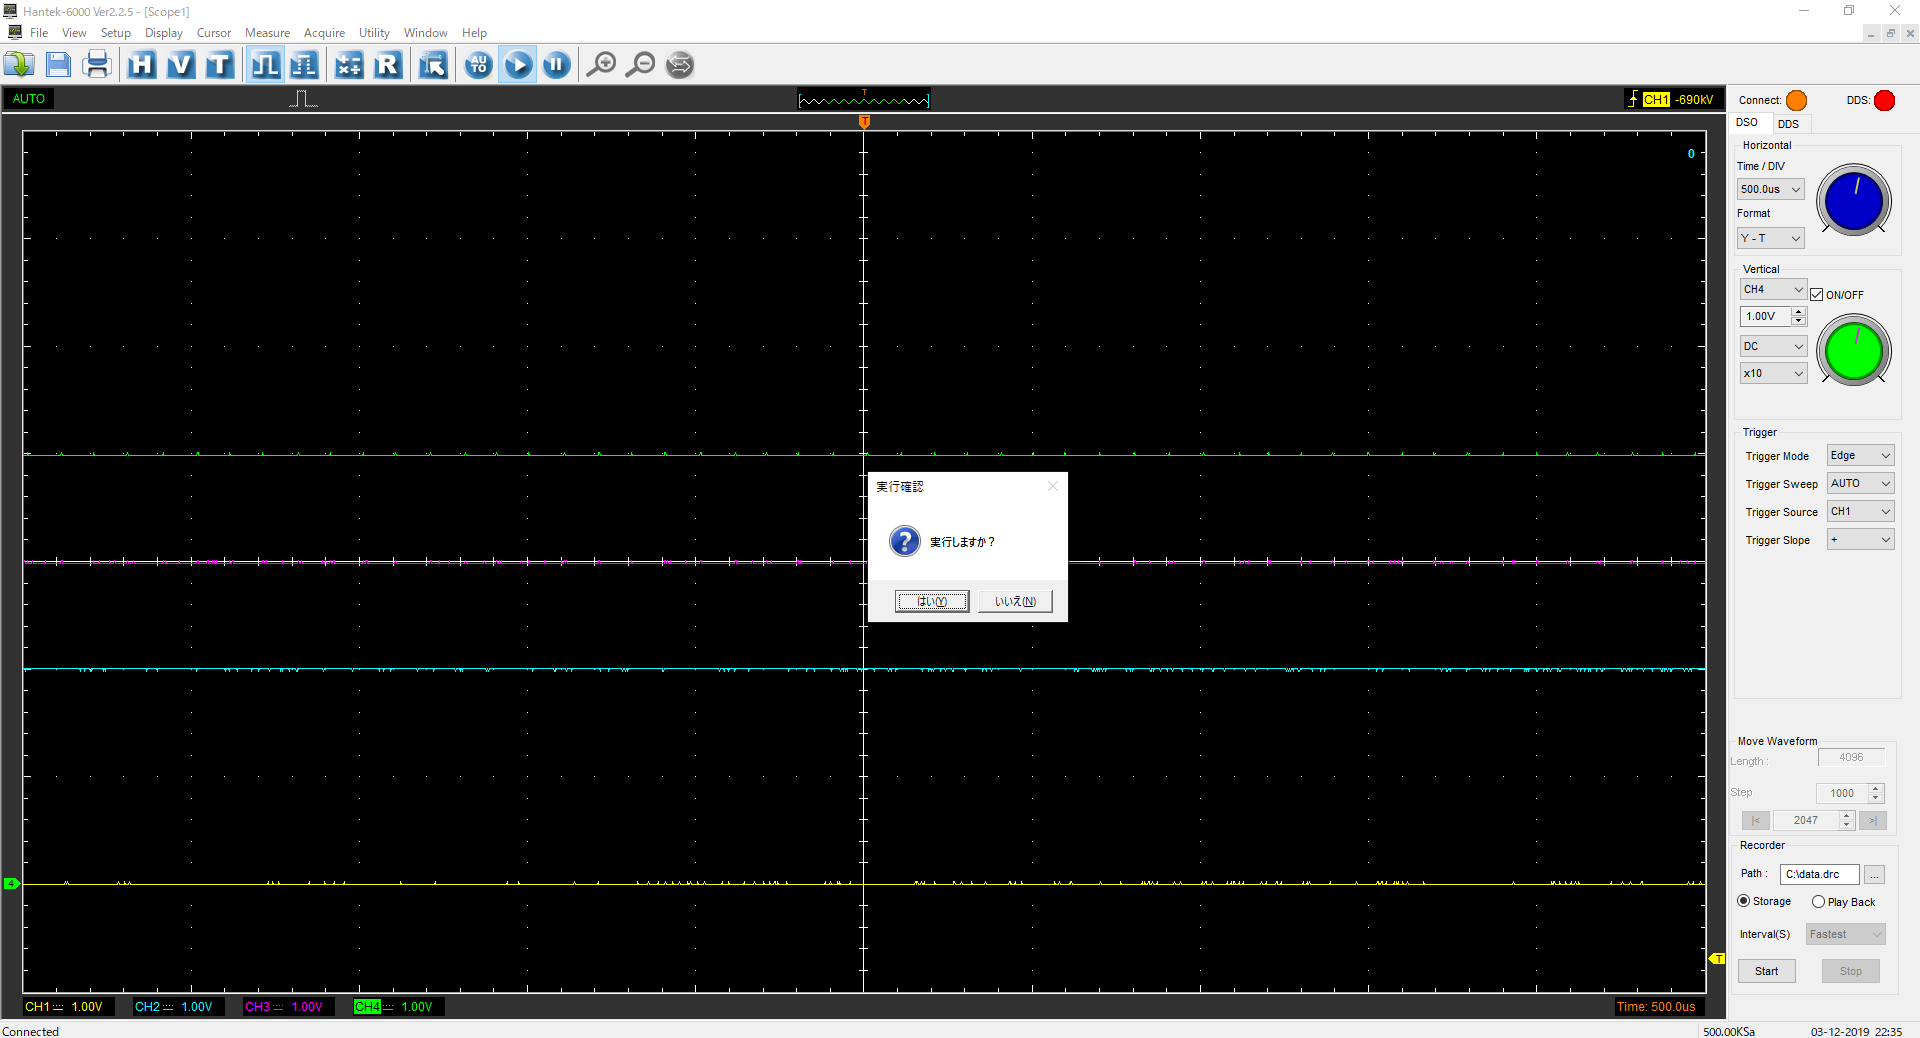
実行確認のダイアログで”はい”を選択すると、波形を保存後各Chの平均値を算出し、OK/NGを表示します。
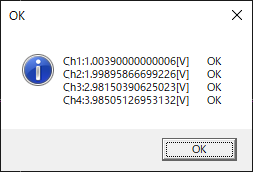
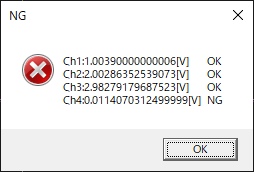
※ここで紹介した方法は簡易的なものですので、実際に弊社の製品に対して行っている方法とは異なります。
データロガーとして使う
定期的に波形データを保存し、それを処理して記録していくことでデータロガー的な使い方ができないか考えてみます。一つ前の例では、ユーザーの操作をトリガとして波形の記録を行いましたが、これを時刻をトリガとするように変更すれば簡単に実現できそうです。
例として、商用電源の電圧と周波数を1分毎に記録することを考えます。
商用電源の波形観測の方法ですが、今回はトランスを使用してAC100VをAC10Vに降圧してオシロに接続しました。
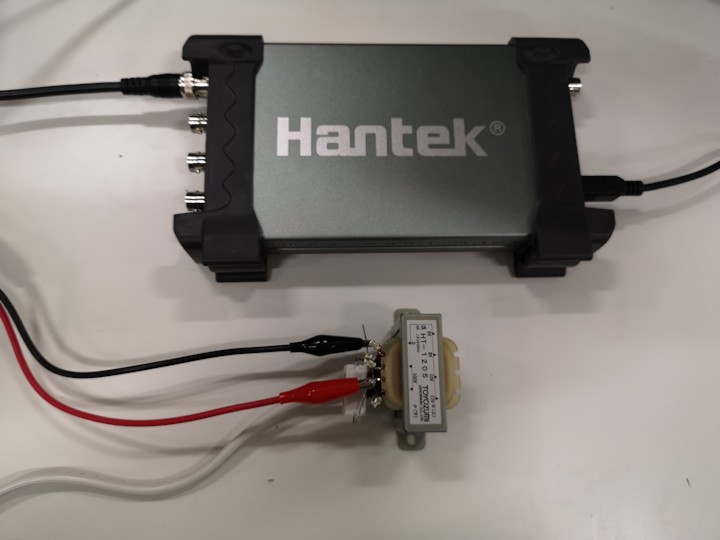
なお、これはPCオシロに限った話ではありませんが、AC100Vを直接プロービングすることは絶対にやめてください。感電・火災の危険があります。また、PCオシロだけでなくPCも壊れてしまうでしょう。
必ず、トランスを使うなどして絶縁してください。
以下にスクリプトを示します。
& 'C:\Program Files (x86)\Hantek6000\Scope.exe'                                 #付属アプリを起動する
while ( (Get-Process | Where-Object {$_.Name -match "scope"}) -eq $null ){}        #"scope"というプロセスが現れるまで待つ
start-sleep -Milliseconds 3000
[System.Windows.Forms.SendKeys]::SendWait("(% X)")
[System.Windows.Forms.SendKeys]::SendWait("%f")
start-sleep -Milliseconds 10
[System.Windows.Forms.SendKeys]::SendWait("{down 3}")
start-sleep -Milliseconds 10
[System.Windows.Forms.SendKeys]::SendWait("{enter}")
start-sleep -Milliseconds 10
$retry_cnt = 0
Set-Clipboard -Value "neko"
do{

    [System.Windows.Forms.SendKeys]::SendWait(".")
    [System.Windows.Forms.SendKeys]::SendWait("^a")
    [System.Windows.Forms.SendKeys]::SendWait("^c")
    start-sleep -Milliseconds 100
    $clip_board = Get-Clipboard -Format Text
    $retry_cnt = $retry_cnt + 1
    if( $retry_cnt -gt 10 ){
        break
    }
}while( $clip_board -ne "." )
start-sleep -Milliseconds 10
[System.Windows.Forms.SendKeys]::SendWait("^a")
[System.Windows.Forms.SendKeys]::SendWait("^x")
[System.Windows.Forms.SendKeys]::SendWait("ac100.set")                            #設定ファイルを読み込む
start-sleep -Milliseconds 10
[System.Windows.Forms.SendKeys]::SendWait("{enter}")
start-sleep -Milliseconds 100
[System.Windows.Forms.SendKeys]::SendWait("^r")
start-sleep -Milliseconds 1000

while ($true){
    $ps = Get-Process | Where-Object {$_.Name -match "scope"}                    #付属アプリのプロセスが見つからなければ終了する
    if($ps -eq $null){
        exit
    }
    $wait_time = ( 55.0 - [double](Get-Date -Format "ss" ) )*1000.0
    if( $wait_time -lt 0.0 ){
        $wait_time = 0
    }
    start-sleep -Milliseconds $wait_time                                        #動作開始5秒前までスリープ
    while( ( Get-Date -Format "ss" ) -ne "00" ){}                                #秒が"00"になるまで待つ
    $data_point = Get-Date -Format "yy/MM/dd HH:mm:ss"                            #波形の取得時刻を記録
    [System.Windows.Forms.SendKeys]::SendWait("^r")                                #Ctrl+rで波形の取得開始
    start-sleep -Milliseconds 1000
    if( (Test-Path ./ac.txt) -eq "True" ){
        Remove-Item ac.txt                                                        #前回取得時の波形データが残っている場合削除
    }
    [System.Windows.Forms.SendKeys]::SendWait("^s")
    [System.Windows.Forms.SendKeys]::SendWait("{tab}")
    [System.Windows.Forms.SendKeys]::SendWait("{right 4}")
    [System.Windows.Forms.SendKeys]::SendWait("{enter}")
    $retry_cnt = 0
    Set-Clipboard -Value "neko"
    do{

        [System.Windows.Forms.SendKeys]::SendWait(".")
        [System.Windows.Forms.SendKeys]::SendWait("^a")
        [System.Windows.Forms.SendKeys]::SendWait("^c")
        start-sleep -Milliseconds 100
        $clip_board = Get-Clipboard -Format Text
        $retry_cnt = $retry_cnt + 1
        if( $retry_cnt -gt 10 ){
            break
        }
    }while( $clip_board -ne "." )
    start-sleep -Milliseconds 10
    [System.Windows.Forms.SendKeys]::SendWait("^a")
    [System.Windows.Forms.SendKeys]::SendWait("^x")
    [System.Windows.Forms.SendKeys]::SendWait("ac.txt")                            #波形データの保存
    [System.Windows.Forms.SendKeys]::SendWait("{enter}")
    start-sleep -Milliseconds 16384                                                #波形取得終了までスリープ

    do{
        $exists = Test-Path ac.txt
    }while( $exists -ne "True" )                                                #ファイルが現れるまで待つ

    start-sleep -Milliseconds 1000
    [System.Windows.Forms.SendKeys]::SendWait("{enter}")                        #"Save Data OK!"のダイアログを消す
    start-sleep -Milliseconds 1000
    [System.Windows.Forms.SendKeys]::SendWait("^o")

    $txt = Get-Content ./ac.txt                                                    #波形データの読み込み
    $txt_ch1 = $txt[5..4100]                                                    #ch1分の切り取り
    $sum = 0.0
    $sign = 0
    $sum_sign = 0
    $txt_ch1 | ForEach-Object -Process {
        $sum = $sum + [double]$_*[double]$_                                        #自乗の積分(実効値の算出のため)
        $last_sign = $sign
        if( [double]$_ -ge 0.0 ){
            $sign = 1
        }else{
            $sign = 0
        }
        if( $sign -ne $last_sign ){
            $sum_sign++                                                            #ゼロクロスのカウント
        }

    }
    $rms = [math]::sqrt( $sum / 4096.0 )                                         #実効値の算出
    $freq = $sum_sign / (1/250*4096) / 2                                        #周波数の算出

    $output_line = $data_point + "    " + [string]$rms + "    " + [string]$freq
    Write-Output $output_line
    Add-Content -Path freq_result.txt -Value $output_line                        #実効値と周波数をファイルに書き出し

    Remove-Item ac.txt                                                            #波形データの削除
}
簡易検査治具の例では電圧の平均値を算出しましたが、こちらの例では電圧の自乗平均を算出し、その平方根を取ることで実効値を算出しています。同時に、ゼロクロス点をカウントすることで周波数を算出します。
実際に筆者の自宅にて30時間程度ログを取ってみた結果を示します。
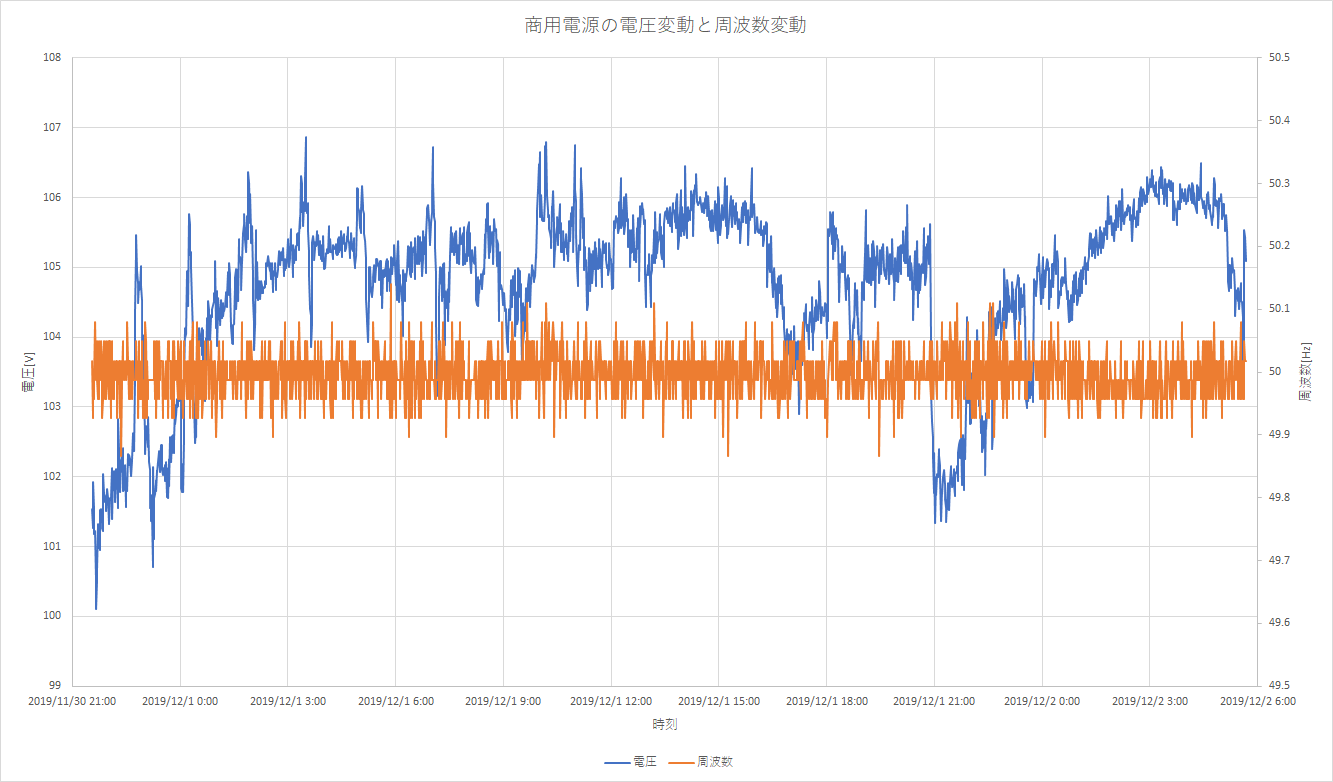
周波数の変動はほとんど測定限界以下で非常に安定していることがわかります。電圧については21時ごろに最も低下するようです。
近所に深夜電力を利用した電気温水器などの設備があるのかもしれません。
展示会場での設定変更を自動化する

- マスタースレーブモード
- 定速運転モード
& 'C:\Program Files (x86)\Hantek6000\Scope.exe'                                    #付属アプリを起動する
while ( (Get-Process | Where-Object {$_.Name -match "scope"}) -eq $null ){}        #"scope"というプロセスが現れるまで待つ
$com = New-Object System.IO.Ports.SerialPort "COM2",                            #COM2を指定(環境により異なる)
9600,([System.IO.Ports.Parity]::None),8,([System.IO.Ports.StopBits]::One)        #9600bps,パリティなし,8bit,ストップビット1bit
$com.NewLine = [Char]0x0D + [Char]0x0A                                            #終端はCR+LF
$com.ReadTimeout = 100                                                            #受信のタイムアウトを100msとする
$com.Open()                                                                        #シリアルポートを開く
while ($data -ne "end") {                                                        #"end"という文字列を受信するまで無限ループ
    if( ( Get-Process | Where-Object {$_.Name -match "scope"} ) -eq $null ){    #付属アプリのプロセスが存在しなければ終了する
        $com.Close()
        $com.Dispose()
        exit
    }
    try{
        $data = $com.ReadLine()                                                   #シリアルポートから受信する
    }catch{
        continue                                                                #100msでタイムアウトが発生するのでそのまま継続
    }
    if ( $data.IndexOf('.set') -ne -1 ){                                        #".set"で終わる文字列を受信した場合その文字列のファイル名の設定ファイルを開く
        start-sleep -Milliseconds 3000
        [System.Windows.Forms.SendKeys]::SendWait("%f")
        start-sleep -Milliseconds 10
        [System.Windows.Forms.SendKeys]::SendWait("{down 3}")
        start-sleep -Milliseconds 10
        [System.Windows.Forms.SendKeys]::SendWait("{enter}")
        start-sleep -Milliseconds 10
        $retry_cnt = 0
        Set-Clipboard -Value "neko"
        do{

            [System.Windows.Forms.SendKeys]::SendWait(".")
            [System.Windows.Forms.SendKeys]::SendWait("^a")
            [System.Windows.Forms.SendKeys]::SendWait("^c")
            start-sleep -Milliseconds 100
            $clip_board = Get-Clipboard -Format Text
            $retry_cnt = $retry_cnt + 1
            if( $retry_cnt -gt 10 ){
                break
            }
        }while( $clip_board -ne "." )
        start-sleep -Milliseconds 10
        [System.Windows.Forms.SendKeys]::SendWait("^a")
        [System.Windows.Forms.SendKeys]::SendWait("^x")
        [System.Windows.Forms.SendKeys]::SendWait($data)
        start-sleep -Milliseconds 10
        [System.Windows.Forms.SendKeys]::SendWait("{enter}")
        start-sleep -Milliseconds 100
        [System.Windows.Forms.SendKeys]::SendWait("^r")
        start-sleep -Milliseconds 1000
        $com.WriteLine("run")   # 送信
    }elseif ( $data.IndexOf('.txt') -ne -1){                                    #".txt"で終わる文字列を受信した場合そのファイル名で波形を保存
        start-sleep -Milliseconds 3000
        [System.Windows.Forms.SendKeys]::SendWait("%f")
        start-sleep -Milliseconds 10
        [System.Windows.Forms.SendKeys]::SendWait("{down 4}")
        start-sleep -Milliseconds 10
        [System.Windows.Forms.SendKeys]::SendWait("{enter}")
        start-sleep -Milliseconds 10

        [System.Windows.Forms.SendKeys]::SendWait("{up}")
        [System.Windows.Forms.SendKeys]::SendWait("{right 4}")
        start-sleep -Milliseconds 10
        [System.Windows.Forms.SendKeys]::SendWait("{enter}")
        $retry_cnt = 0
        Set-Clipboard -Value "neko"
        do{

            [System.Windows.Forms.SendKeys]::SendWait(".")
            [System.Windows.Forms.SendKeys]::SendWait("^a")
            [System.Windows.Forms.SendKeys]::SendWait("^c")
            start-sleep -Milliseconds 100
            $clip_board = Get-Clipboard -Format Text
            $retry_cnt = $retry_cnt + 1
            if( $retry_cnt -gt 10 ){
                break
            }
        }while( $clip_board -ne "." )
        start-sleep -Milliseconds 10
        [System.Windows.Forms.SendKeys]::SendWait("^a")
        [System.Windows.Forms.SendKeys]::SendWait("^x")
        [System.Windows.Forms.SendKeys]::SendWait($data)
        start-sleep -Milliseconds 10
        [System.Windows.Forms.SendKeys]::SendWait("{enter}")

    }
}
$com.Close()
$com.Dispose()
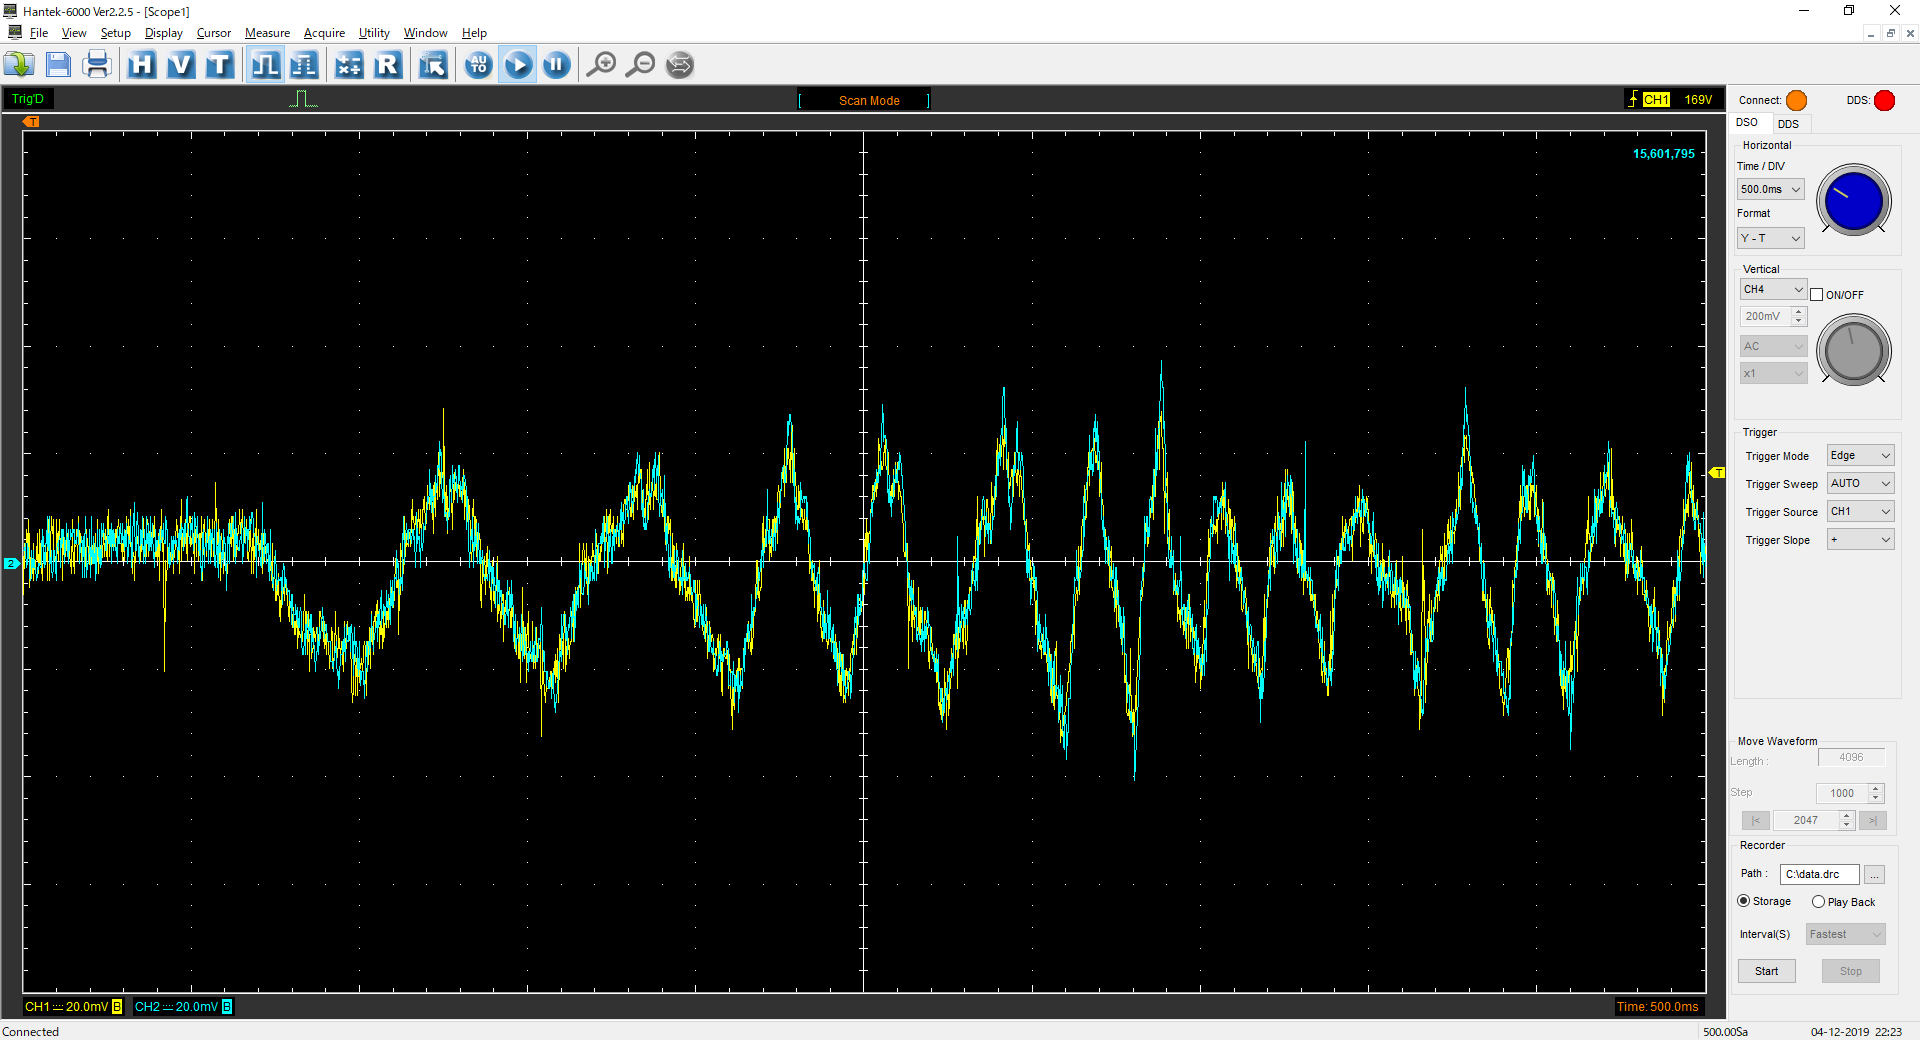
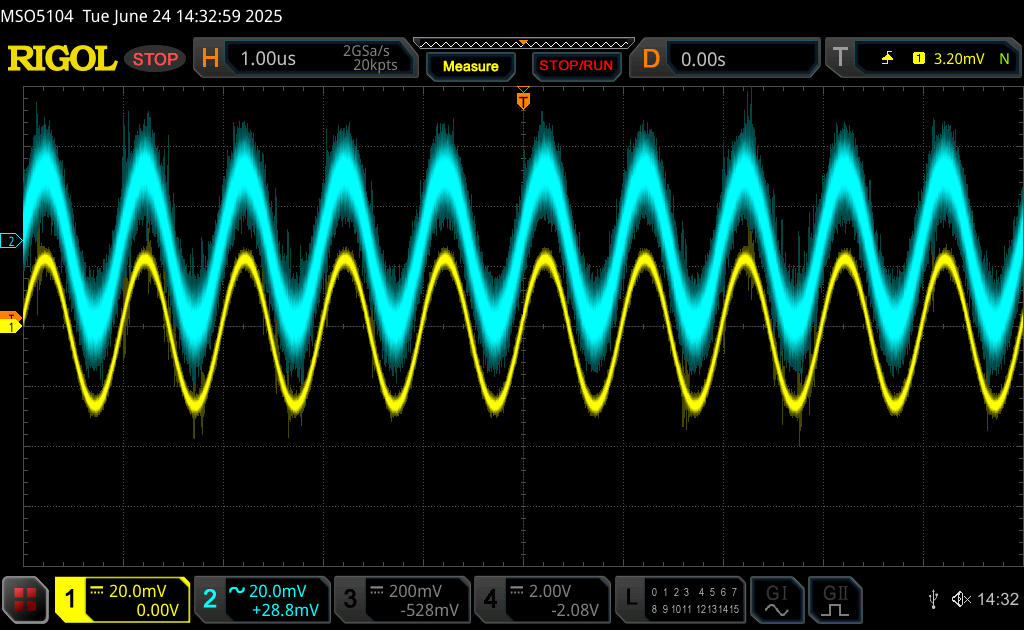
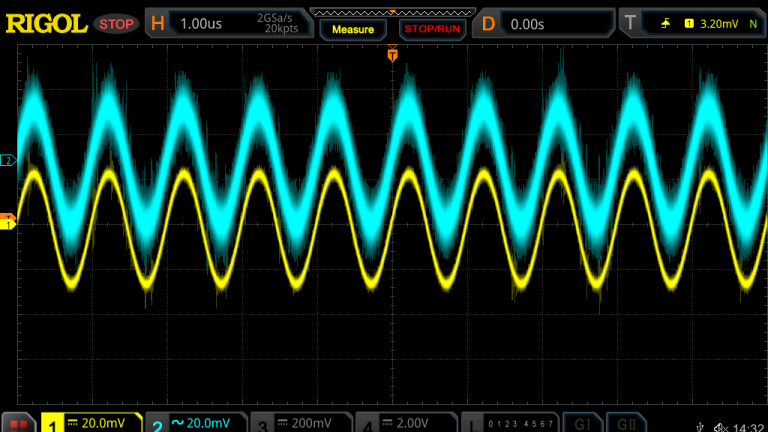
こちらがマスタースレーブモードでの波形です。指令値(黄色)に対してセンサー出力(水色)がよく追従しているのがわかります。
おわりに
著者プロフィール
- Cerevo 電気エンジニア
最近の投稿
 02. ソフトウェア2025.07.30インタラクティブに設計するディジタルフィルタ
 02. ソフトウェア2025.07.23とにかくラフに設計するディジタルフィルタ
 11. その他2025.07.16CP210xシリーズのCOM番号とUSBハブ上の差し込みポートを紐づける
 11. その他2025.07.09アリエク調達のアンプでアクティブプローブを作成する
